Part 1: The Simple Shell
An operating system like Linux makes it easy to run programs. For example, from a shell, it is easy to write, compile, and run a simple hello world C program:
$vi hello.c
#include <stdio.h>
int main() { printf("hello, world\n"); }
$gcc hello.c -o hello
$./hello
hello, world
The operating system makes this easy by providing various functions
to enable the program to perform I/O such as printing, and the shell
to execute the program in response to typing the program executable
name at the shell prompt.
The shell itself is just another
program. For example, the Bash shell is an executable
named bash that is usually located in the /bin
directory. So, /bin/bash.
Try running /bin/bash or just bash on a Linux (or BSD-based, such as Mac OS X) operating system's command line, and you'll likely discover that it will successfully run just like any other program. Type exit to end your shell session and return to your usual shell. (If your system doesn't have Bash, try running sh instead.) When you log into a computer, this is essentially what happens: Bash is executed. The only special thing about logging in is that a special entry in /etc/passwd determines what shell runs at log in time.
Write a simple shell in C. The requirements are as follows.
- Your shell executable should be named w4118_sh. Your shell source code should be mainly in shell.c, but you are free to add additional source code files as long as your Makefile works, and compiles and generates an executable named w4118_sh in the same top level directory as the Makefile. If we cannot simply run make and then w4118_sh, you will be heavily penalized.
- The shell should run continuously, and display a prompt when waiting for input. The prompt should be EXACTLY '$'. No spaces, no extra characters. Example with a command:
$/bin/ls -lha /home/w4118/my_docs
- Your shell should read a line from stdin one at a time. This line should be parsed out into a command and all its arguments. In other words, tokenize it.
- You may assume that the only supported delimiter is the whitespace character (ASCII character number 32).
- You do not need to handle "special" characters. Do not worry about handling quotation marks, backslashes, and tab characters. This means your shell will be unable support arguments with spaces in them. For example, your shell will not support file paths with spaces in them.
- You may set a reasonable maximum on the number of command line arguments, but your shell should handle input lines of any length. You may find getline() useful.
- After parsing and lexing the command, your shell should execute it. A command can either be a reference to an executable OR a built-in shell command (see below). For now, just focus on running executables, and not on built-in commands.
- Executing commands that are not shell built-ins is done by invoking fork() and then invoking exec().
- You may NOT use the system() function, as it just invokes the /bin/sh shell to do all the work.
- Ensure Ctrl-C works. Typing Ctrl-C in your shell should function as expected, that is, if a command is running, the command will terminate, but your shell should not terminate.
- Implement Built-in Commands, exit and cd. exit simply exits your shell after performing any necessary clean up. cd [dir], short for "change directory", changes the current working directory of your shell. Do not worry about implementing the command line options that the real cd command has in Bash. Just implement cd such that it takes a single command line parameter: the directory to change to. cd should be done by invoking chdir().
- Error messages should be printed using exactly one of two string formats. The first format is for errors where errno is set. The second format is for when errno is not set, in which case you may provide any error text message you like on a single line.
"error: %s\n", strerror(errno)

OR

"error: %s\n", "your error message"
So for example, you would likely use: fprintf(stderr, "error: %s\n", strerror(errno));
- Check the return values of all functions utilizing system resources. Do not blithely assume all requests for memory will succeed and all writes to a file will occur correctly. Your code should handle errors properly. Many failed function calls should not be fatal to a program.
Typically, a system call will return -1 in the case of an error (malloc will return NULL). If a function call sets the errno variable (see the function's man page to find out if it does), you should use the first error message as described above. As far as system calls are concerned, you will want to use one of the mechanisms described in Error Reporting.
- A testing script skeleton is provided in a GitHub repository to help you with testing your program. You should make sure your program works correct with this script. For grading purposes, we will conduct much more extensive testing than what is provided with the testing skeleton, so you should make sure to write additional test cases yourself to test your code.
Part 2: Simple Shell Directly Calling System Calls
The simple shell you wrote in Part 1 relies on various C library functions that in turn call system calls. You can use strace to see what system calls are being called when you run simple shell. First, install strace:
sudo apt install straceThen you can run strace with simple shell:
strace -o trace.txt ./w4118_sh
which will dump the system calls executed into the file trace.txt. For example, if you used printf() to output text in simple shell, you will find that it in turn calls a system call to actually perform the I/O operation because I/O is controlled by the operating system. C library functions such as printf() are technically not part of the C language, but made possible by relying on functionality provided by the operating system.
If you want to trace not only the system calls executed by the shell but any processes it creates, you can add the follow-forks option:
strace -o trace.txt -f ./w4118_sh
To gain a better understanding of how C library functions rely on operating system functionality, modify your simple shell so that it does not call any C library functions that call other system calls. Instead, your simple shell should directly call any system calls that it implicitly uses. For example, your simple shell should not call printf() but instead call write() on STDOUT. Other C library functions that you may also have to replace include getline(), malloc(), etc. You do not have to be overly concerned with efficiency, so you may find it easier to use mmap() instead of sbrk() for any dynamic memory allocation you need to do. For example, you may find it helpful to see this implementation of malloc(). String manipulation functions such as strtok and strcmp do not call system calls and do not need to be replaced.
Linux provides system calls which may have duplicative functionality and which system calls your simple shell uses depends the implementation choices made by the C library; you should carefully check the trace you generated to see which system calls the shell should directly call. For example, is the fork() system call actually used? You may find it useful in some cases to utilize the the general purpose syscall(2) system call. You can consult its man page for more details: man 2 syscall.
Note that your implementation of the various functions only has to work specifically for your simple shell. For example, you do not need to implement all functionality supported by printf(), only what functionality is required to print the output that your shell generates. Similarly, your input functionality only needs to work for any ascii characters generated from a keyboard.
Your shell executable should be named w4118_sh2. Your shell source code should be mainly in shell2.c, but you are free to add additional source code files as long as your Makefile works, and compiles and generates an executable named w4118_sh2 in the same top level directory as the Makefile. If we cannot simply run make and then w4118_sh2, you will be heavily penalized. w4118_sh2 should have all the same functionality as w4118_sh, except that it does not call any C library functions that call other system calls.
Part 3: Bare-metal Hello World OS
Without an operating system, running a program on a computer will be harder. On an x86 computer, when the power button is pressed, the CPU is reset to its initially state and firmware, the BIOS, is executed. The BIOS checks the hardware resources of the computer, loads the first program on the storage device, for example the hard drive, into the RAM and transfers control to the program.
On an x86 computer, the BIOS reads the first sector (512B) of the hard drive, looking for the MBR (Master Boot Record). The MBR is identified by being a 512B record that ends with magic number 0x55 and 0xaa at the last two bytes. It holds the initial bootstrap code and all of the necessary information to boot the machine into the operating system. If the first sector is an MBR, the BIOS loads it into the RAM at 0x7c00 and starts executing from that position.
Usually, the bootloader is located at the MBR sector and loads the operating system, which can implement more complex functionality. But it is not necessary. A simple operating system can also be loaded directly by the BIOS. The simple operating system can be as simple as a program that prints "hello, world" to the screen. However, the program that is loaded by the BIOS does not, at least initially, have an easy-to-use C environment in which to execute.
-
Implement a Hello World OS.
Write a simple Hello World OS that boots and prints
"hello, world" to the screen. Almost all of your code
should be in C, but there will be a tiny bit of assembly code
programming for you to do. Because the boot procedure is
architecture-dependent and more standardized on x86
computers, this portion of the assignment is x86-specific.
You will use QEMU so that you
can do the assignment using non-x86 computers too.
We provide the starter assembly code entry.S. The starter code sets up a stack to switch from assembly code to C and then calls the main function defined in main.c:
call main
Note that this main function is not a standard C main function for general C programs so it does not have to return an integer. The name of the function does not even have to be main, except for the fact that this is the name used in the assembly code. Note that your C code is compiled with various options indicating that it is standalone and does not rely on the standard C library or standard include files which are not available with your simple operating system.Modify the file main.c by writing C code to output "hello, world" to the VGA console. Because there is no separate operating system, there are no helper functions to perform I/O. However, the VGA console can be accessed just like regular memory, so you can simply perform regular memory writes to cause output to appear on screen. Specifically, the machine is initially in real mode, which means that memory is accessed directly using physical RAM locations. The framebuffer of the VGA console is mapped so it appears as physical RAM memory starting from 0xb8000. In text mode, you can print out characters by writing ascii codes starting at that position.
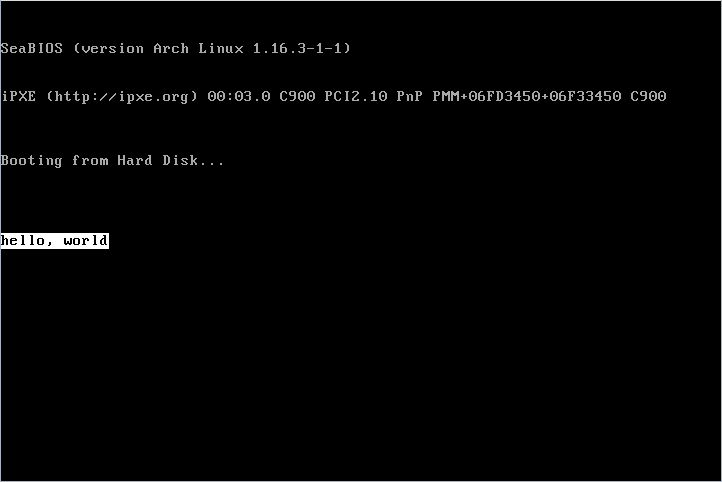
You should print out "hello, world" with white background color and black foreground color at the center of the console, all with lower case letters. The default VGA console can print 80*25 characters. You should print "hello, world" with the specified color and position it so it is aligned to the center of the console vertically and horizontally, with the comma after the first word and a space after the comma before the second word. The following is an example showing the correct printing on the screen:

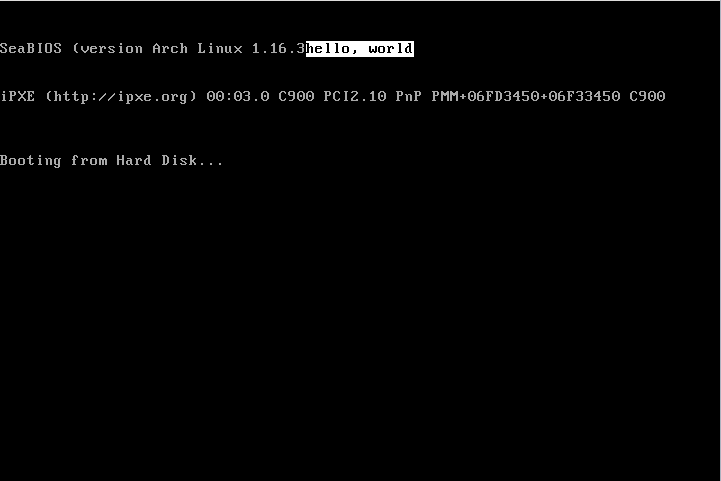
In contrast, the following examples show INCORRECT printing because of incorrect placement, extra spaces, etc.:


The memory for each character on the VGA console is two bytes - one byte for the ascii code and the other for the color. For example, to print "hello, world" to the beginning of the VGA console, you want to write 'h' to 0xb8000, 'e' to 0xb8002. You can modify the second byte to change the color. The color byte can be used to control both the foreground and background color of the character, with the higher 4 bits for the background and the lower 4 bits for the foreground:
Bit:     | 7 6 5 4 | 3 2 1 0 |
Content: | BG      | FG      |
and the color is defined as:Color Value Color Value Color Value Color Value Black 0 Red 4 Dark grey 8 Light red 12 Blue 1 Magenta 5 Light blue 9 Light magenta 13 Green 2 Brown 6 Light green 10 Light brown 14 Cyan 3 Light grey 7 Light cyan 11 White 15 However, there are some limitations due the fact that the machine will initially boot in 16-bit real mode, so your code should run in 16-bit mode. This means you will not able to directly access the framebuffer because the starting address for the framebuffer is beyond the addressing limit (ie 0xb8000 > 0xffff). Instead, you will need to use segmentation on x86, in which
physical address = (segment base * 0x10) + segment offset
We have included the lines of assembly code in main.c that are required to set the segment base, but the lines current set the segment base to 0:__asm__("mov $0x0, %ax"); __asm__("mov %ax, %ds");You need to modify that code to set the segment base of the starting address so that you can access the framebuffer. After those lines of assembly code, you can then use C code to write characters to the VGA console if you specific the correct addresses based on the fact that the resulting physical address is calculated according to the formula above.Note that all of your code in main.c along with the code in entry.S must build and fit in the 512B available for the MBR. You should also not use any global variables in your C code to write characters to the framebuffer. You should keep in mind about the code size. An -Os flag from gcc when compiling should be helpful here. If you want to use loop of some kind to save code size, please use volatile modifier for the index variables to avoid unexpected behaviors caused by compiler optimization. Once you have finished writing characters to the framebuffer, you need to prevent the machine from going off into undefined behavior. In particular, the assembly code in entry.S does nothing further once the main function returns. Since there are no further instructions specified to run, the CPU will not know what to do and the system will crash if you reach this state. You should ensure that your hello world OS does not let the machine run into this undefined state. A loop of some kind here would be useful.
-
Create a floppy disk image that holds the Hello World
OS. To start the computer from power on without
requiring a bootloader, you need to use a storage
device to hold your Hello World OS such that its first
sector is an MBR. For this purpose, you can create a floppy
disk image such that the last two bytes of the first sector
contain the required magic number 0x55 and 0xaa. To do
this, you will compile your main.c and link it
with an assembled entry.S to create the disk
image, ensuring that the magic number required is placed in
the 511th and 512th bytes of the image. We have provided a
linker script that does most of the hard work.
x86 VM: If you are using an x86 VM, the commands you need to execute are:
as --32 -Os -o entry.o entry.S
gcc -c -m16 -ffreestanding -fno-PIE -nostartfiles -nostdlib -Os -o main.o -std=c99 main.c
ld -m elf_i386 -z noexecstack -o main.elf -T linker.ld entry.o main.o
objcopy -O binary main.elf floppy.flp
which will create the floppy image floppy.flp, padded with zero bytes at the end beyond the 512th byte.Arm VM: If you are using an Arm VM, you will first need to install the cross-compile toolchain in your VM:
sudo apt install crossbuild-essential-amd64
Then the commands you need to execute are:x86_64-linux-gnu-as --32 -Os -o entry.o entry.S x86_64-linux-gnu-gcc -c -m16 -ffreestanding -fno-PIE -nostartfiles -nostdlib -Os -o main.o -std=c99 main.c x86_64-linux-gnu-ld -z noexecstack -m elf_i386 -o main.elf -T linker.ld entry.o main.o x86_64-linux-gnu-objcopy -O binary main.elf floppy.flp
which will cross-compile the x86 code in your Arm VM and create the floppy image floppy.flp, padded with zero bytes at the end beyond the 512th byte. -
Using your floppy image to boot in QEMU.
You could reboot your VM using your floppy image if
you have an x86 VM, but this will not work for an Arm
VM because your Hello World OS is x86-specific. To
provide a consistent approach for both x86 and Arm VM
users, you will instead use QEMU to create a virtual
x86 computer inside your VM to use to boot your Hello
World OS. QEMU is a machine emulator that you can use
to run x86 code on Arm hardware and it can also run
x86 code on x86 hardware. First install QEMU in your VM:
sudo apt install qemu-utils qemu-system-x86 qemu-system-gui
Then you can use the floppy image to boot an x86 machine using QEMU:sudo qemu-system-x86_64 -drive file=floppy.flp,format=raw -vga std
Note that the options for this QEMU command require access to the graphical user interface of the VM and so will not work over SSH. You must first install the qemu-system-gui package before launching QEMU and you should not use QEMU with -nographic option. Other than the cross-compilation, the other instructions are the same for both x86 hardware users and Arm hardware users. You should be able to boot using QEMU with the Hello World OS you built and see "hello, world" printed on your console. -
Add instruction and stack pointer information to your output.
A CPU uses a program counter (also known as instruction
pointer) and stack to run C programs. The instruction
pointer (IP) refers to the location in memory from which to
get the CPU instruction to execute. The stack pointer (SP)
refers to the location in memory where the stack is located
for the program, which is required for any programs that make
function calls. When making a function call, the IP is
saved on the stack so that when the function call is done,
the IP can be popped off the stack to return program
execution to right after where the function call was
originally initiated. The IP and SP are stored in special
CPU registers. You should retrieve those values as part of
your Hello World OS and output them along with the "hello,
world" message.
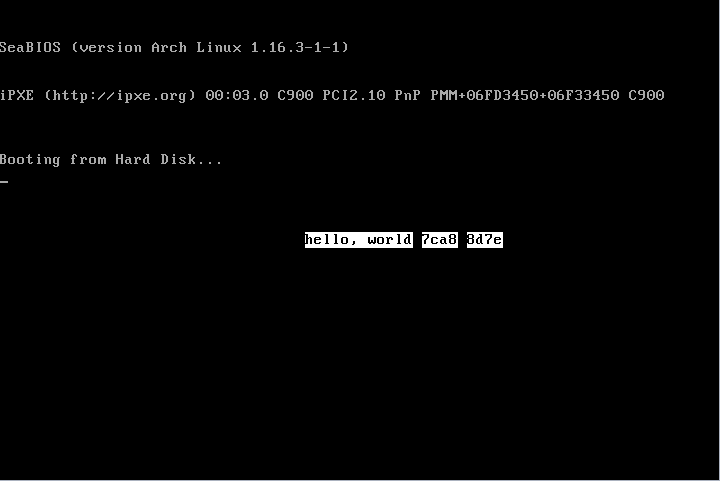
The exact format of your message should be "hello, world ip sp", which one space before the actual ip and sp values, respectively and the space should be black background. Do not add additional spaces and make sure you use the correct background and foreground color. The ip should be the actual instruction pointer address right after the code used to output "hello, world". The sp should be the actual stack pointer address after calling the main function in main.c from entry.S. Each address should be printed as a 4 digit lower case hexadecimal number; only 4 digits are required because you are running in 16-bit real mode. Do NOT print anything other than the 4 digits for each value (ie. no leading 0x). To output the addresses as characters, you need to convert them to ascii characters and then write them to VGA memory. Note that the position of "hello, world" should be exactly the same as before without the ip and sp values. The following is an example showing the correct printing on the screen with ip and sp values of 7ca8 and 8d7e, respectively:

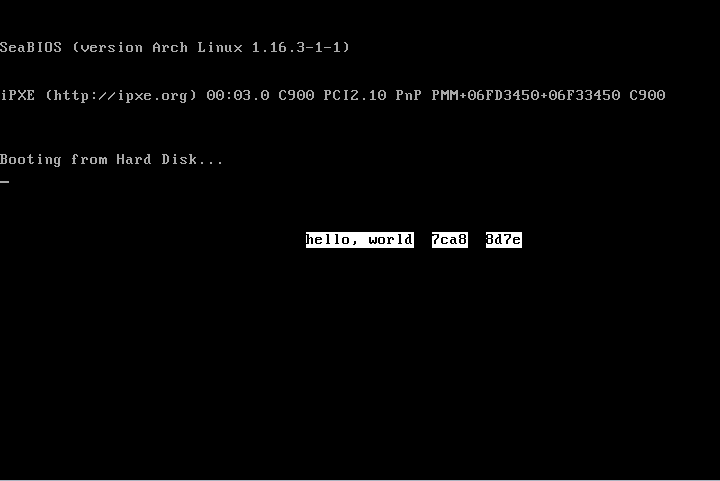
In contrast, the following examples show INCORRECT printing because of incorrect background color, extra spaces, etc.:


To read the IP and SP registers, you need to use assembly code. The SP register can be read directly using the mov instruction. We have included the lines of assembly code in main.c that are required to get the address needed:
__asm__ volatile (
	"mov %%sp, %0"
	: "=r" (sp_value)
	:
	: "memory"
);
You need to modify the code to define a local variable sp_value so that you can get the stack pointer value after calling this inline assemly code.Reading the IP register is more complicated as there is no way to directly read the IP register. Instead, we have provided some assembly code defined in entry.S to the get the IP value:
.global get_ip

...

get_ip:
    pop %ax
    push %ax
    ret
get_ip() is declared as a function in main.c. It uses the fact that on a function call, the stack stores the address of the next instruction to execute after a function call at the top of stack as the return address. It also uses the fact that an x86 function call uses register ax to stores the return value. To get the IP value, you need to call this get_ip() function right after the code used to output "hello, world" in main.c file and get the ip you want from the return value. Calling get_ip() will store the address of next instruction after the call to get_ip() at the top of stack. pop %ax pops the top of stack to register ax so that the program counter will be returned as return value, and push %ax to puts it back on the stack for the correct return of calling function get_ip(). Note that get_ip() returns the address of the instruction after get_ip(); you will need to do additional work to get the correct instruction address right after the code used to output "hello, world".Once you have completed your program, you will need to redo steps 2 and 3 above to recompile the code to generate a new floppy.flp image and boot it in QEMU.
As part of your submission, you should ensure that a Makefile is included under the part3 directory to compile your code and create a bootable disk image (see above for disk creation instructions, or refer to the provided Makefile). The bootable disk image must be named floppy.flp.